Chuyển đến nội dung chính

A New Attack for Wi-Fi Has Been Released Called wifiphisher


wifiphisher router wifi attack


A new Attack for Wi-Fi has been released called Wifiphisher.

This attack is a play on old tricks using a Man-in-the-Middle and phishing attack.

It works by selecting a target router then kicking their connection which forces them to connect to you instead of their router.
A new Attack for Wi-Fi has been released called wifiphisher


When they do they are asked for their Wi-Fi username and password to upgrade the firmware of the router.
Wifiphisher new wireless router attack

After they enter their password it is displayed to your screen. Once you have the password, they are allowed to automatically reconnect to their router and move on.

They have the attack listed as the following steps.


From the victim’s perspective, the attack makes use in three phases:
1…..Victim is being deauthenticated from her access point. Wifiphisher continuously jams all of the target access point’s wifi devices within range by sending deauth packets to the client from the access point, to the access point from the client, and to the broadcast address as well.

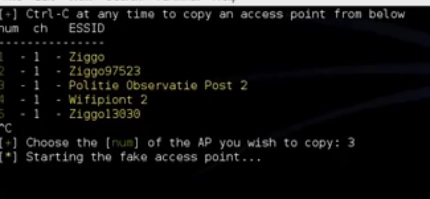
2…..Victim joins a rogue access point. Wifiphisher sniffs the area and copies the target access point’s settings. It then creates a rogue wireless access point that is modeled on the target. It also sets up a NAT/DHCP server and forwards the right ports. Consequently, because of the jamming, clients will start connecting to the rogue access point. After this phase, the victim is MiTMed.

3…..Victim is being served a realistic router config-looking page. wifiphisher employs a minimal web server that responds to HTTP & HTTPS requests. As soon as the victim requests a page from the Internet, wifiphisher will respond with a realistic fake page that asks for credentials, for example one that asks WPA password confirmation due to a router firmware upgrade.
 It runs from Kali Linux and needs two wireless cards one that the victim can connect to and another to kick their connection with the Deauth command which requires a Kali Linux compatible adapter to do. See here for compatible Kali Linux USB adapters that can do this.

This is a tool that I am going to play with on my test routers and see how well it works.

To install wifiphisher, open a terminal window and enter the following command.
git clone https://github.com/sophron/wifiphisher.git

To run it type:
cd wifiphisher
sudo python ./wifiphisher.py

Here is the Github home page for wifiphisher. https://github.com/sophron/wifiphisher

Here is a YouTube video showing it.

https://www.youtube.com/watch?v=Ui7rq6qb9kc

Bài đăng phổ biến từ blog này

Hack the Gibson VM (CTF Challenge)

It’s a boot2root challenge and it does not get over with getting root access. You have to find flag also. So let’s start. First of all download lab from https://download.vulnhub.com/gibson/gibson.ova Now open kali terminal and like always start with first step i.e. netdiscover netdiscover it shows all the hosts those are up in our network and from here we get our target ip. Target IP: 192.168.1.6 As our target is all set we are going to scan it with nmap which will show all the open ports. In this case open ports are only two i.e. 22 and 80. nmap –p- -A 192.168.1.6 As from the above result we have got 80 port open so we will open target ip in browser. It shows an accessible directory. Let’s try opening it as we cannot see anything important here. Oh no such luck with this also. It’s written the result will be found by brute force but there is no place where we can apply brute force. As we do not have any other option so let’s just go to view page source to see if we could get a...

Penetration Testing in PwnLab (CTF Challenge)

In this article we will walkthrough a root2boot penetration testing challenge i.e PwnLab. PwbLab is a vulnerbale framework, based on the concept of CTF (capture the flag), with a bit of security which is a little complicated to bypass. But it’s not impossible. So, let us learn how we can get its access. Download From Here Now to start let us, firstly, consider that we do not know the IP of the PwnLab, therefore search for the IP address before hand and for that there is a command that shows us all the IP’s present in our network, so go to the terminal of you Kali and type : netdiscover Target IP = 192.168.0.105 And to know that we start our penetration testing. So, first, we will now scan with nmap , we will apply an aggressive scan as it gives detailed information and is fast. The command is : nmap -A 192.168.0.105 We have the result of scanning and as you can see there are only three ports open and they are: 80, 111, 3306. Our target IP is 192.168.0.105 as its MAC Vendor is...

Hack the Pentester Lab: from SQL injection to Shell II (Blind SQL Injection)

Today we are going to perform penetration testing with part II of previous lab, download it from  here . Now install the iso image in VM ware and start it. In this lab task level is intermediate and challenge is to gain access of administration console and then upload a PHP webshell. Start Kali Linux then open the terminal and  type netdiscover  command for scanning network. Here  192.168.1.102  is my target IP which is shown in the screenshot. Now explore this IP in browser. When you will open target IP in browser you will get a web page having heading My Awesome Photoblog . On the top of left side it contains some tags: home; test; ruxcon; 2010; all pictures; admin. Now  Click  on  test . The given URL : http://192.168.1.102/cat.php?id=1  will run sql query for  ID 1  now let try to find out whether the above URL is vulnerable to sql injection or not by adding( ‘) apostrophe at last of URL: http://192.168.1.102/cat.p...